Showing posts with label kid friendly. Show all posts

Saturday, June 20, 2009

Never say "Easy"

I should have known better. By very nature of my mom's maiden name, Murphy, I SHOULD have known better.

Who would have thought that a simple character-cookie like Elmo would have been such a monumental challenge?
Clearly *I* didn't... because I told Cathy that it would be EASY to do cookies for her son's second birthday.
hahahahahahahahahahahahahahahahahahahahaha


HAH.


I'm not going to bore you with ALLLL of the details... but the highlights of my journey into the depths of believing that Elmo was truly the spawn of Satan include:

not being able to find an Elmo-shaped cookie cutter ANYWHERE, thus having to CREATE one from scratch

not having enough 'red dye' to create an Elmo-y shade of frosting, thus having to stop mid-mixing to go buy MORE red dye to get out of the pink realm.

in new jersey, because I was at my parents' house.

waiting 12 extra hours, unable to do anything while I waiting for the 'it's about time it's finally red' frosting to harden. only to find out that it NEVER DID, thus causing me to have to...

THROW AWAY entire first batch of cookies and re-create, roll, cut, bake, and apply new first
coat of "oh dear lord I have to make red again" frosting.

before 9am, because that was the day I promised to take my kids down the shore.

Re-attack the final detail pipings so they have a chance to dry before being packaged up and sent off to the birthday boy.

only to find out the post office did not offer 2nd day air, and had to ship them overnight.


*sigh*


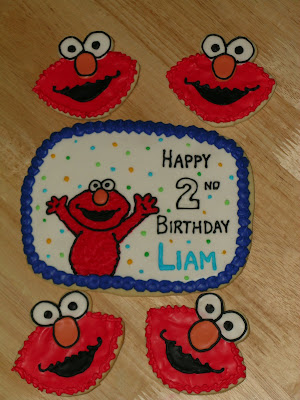
don't get me wrong. This project was a GREAT experience, and I was so so sooooo happy to do it. but MAN! issue after issue! Here's a look at the final results:

Elmo- take two... but with a NICE shade of red


They may look like they're smiling, but they're really laughing at me


Elmo heads together with the centerpiece cookie


From paper to product-- using clipart and the invite for inspiration


all wrapped up and ready to go


Ultimately, I think that this was a great reminder that I shouldn't take anything for granted... and like baking itself... the slightest variation with technique, ingredients, and/or location can create exponential differences in the final product.

There was no question ever I wouldn't get this project done. Cathy is a wonderful woman whom I've met through the internet. She has a heart of gold and is just a KIND person in general. Of course... having a 2 year old myself... there is absolutely NO WAY on this green earth that I would send her son anything that didn't look like Elmo. There was absolutely no room for failure in this project... and I feel pretty confident that Cathy and her birthday boy, Liam, were pleased with the final results.


I know my daughter Rhena was.


kid-tested and Elmo Approved!


Happy birthday, Liam!!

Thursday, May 7, 2009

Send 'em Some Sugar (Literally!)

Do you ever see something and think.. oh, that's cute.. I could do that... then forget all about it?

A while back I had seen something in one of the many cake decorating books that I buy about decorating sugar cubes for a party. Cute idea, right? I thought so too.. then promptly forgot all about it.

The other day I indulged and bought myself another book called Beautiful Cakes by Peggy Porschen. It was in a discount bin, so I really couldn't resist. Sure enough, as if by fate.. the very last feature in her book (as well as the back cover art) is home-made sugar cubes.

I figured the baking gods must be screaming at me, cause sure enough.. here we are nearing the end of Teacher Appreciation Week, and a mere few days away from Mother's Day, and I have NOTHING. no gifts, no cards, nothing in the mail on the way anywhere... NOTHING. Ladies and gentlemen.. this is a time to send some SUGAR!

I will say that this was so ridiculously easy that I almost feel guilty giving this as a gift. With some sugar, a half of a drop of neon food coloring, a splash of water to dampen the sugar and my itty-bitty cookie cutters... I was totally in business.


really. if you've ever built a sand castle... you can do this. Take care that the sugar isn't TOO wet, make sure it isn't too dry, and be sure to pack it down.


oh, and wait a few minutes before trying to remove the cutter. otherwise you might end up with a jacked-up sugar shape.


or worse... a real mess.


within an hour or two, the sugar shapes were ready to be handled (GENTLY) to have their picture taken... but I'll be letting them 'dry' over night before I package them up. Nonetheless... here they are ready to sweeten a special some one's day.

Each of my daughter's teachers (and a few of my favorite friends that are moms) will be getting a box of tea and some home-made sugar cubes. While I have them slated for Teacher Appreciation and Mother's Day gifts.. these can certainly work as adorable favors for a baby shower, bridal tea, birthday, princess party, or even a get-well gift (spoonful of sugar helps the medicine go down, right?)


Happy Mother's Day... Happy Teacher Appreciation Week, and just Happy Day in general! Now go send some sugar to someone... if they haven't already... they might just do something sweet for you in return.

Wednesday, May 6, 2009

Grahamtastic

I've said it before. I'm SURE I'll say it again.


This recipe for home-made graham crackers is GREAT! A certain drawback is that of any other dough I make, I just can NOT help myself from eating this raw. maybe it's the honey, maybe it's the graham wheat flour itself, but all I need is a spoon and a bowl of this stuff. (Just don't tell my daughter... I tell her all the time we can't eat things because of raw eggs. she'd have a hypocritical field day with me if she knew how much I was sneaking behind her back.)


Of course, my main reason for making this recipe is so I can get my little graham cracker rounds for some of my Happy Jane varieties. but every time I DO make them I think... "Why don't I make these more often???"


If you have ever made a sugar cookie or cookie using a cutter with any success, then you can TOTALLY make these grahams. My only suggestion is to be sure to roll them out so they are thin. In the past I've made them thick like my cookies, and the kids just end up looking at me weird. like I'm giving them dog biscuits or something.


We were super boring and stuck with squares this time around, but I did let the kids 'prick' the holes in the top and 'help' with the sprinkling of the cinnamon sugar before baking. (notice the HEAVY layer of sugar??)


no joke.. any time of year these are a light and fun snack. and it should be noted that despite my kids' habit of a heavy pour/sprinkle of sugar on top, this treat has FAR less sugar than the majority of store-bought varieties out there. Almost kind of gives you the green light to cover them in chocolate and marshmallows, you think?


Sunday, January 4, 2009

More-than-S'Mores

Ladies and gentlemen... I'm happy to announce I have created another Happy Jane Flavor.

Meet the "More-than-a-S'more"....


I was going to call them S'mores a Go-Go, but I used that name for a post I did about little S'mores favors I made for my son's first birthday. Who knows.. maybe I will go with the Go-Go name. but not now. Now I just want to share the latest Jane.


So she was SUPER easy to make... did a batch of the home-made graham crackers. I'm definitely loving that recipe that Cupcake Project posted. LOVE IT!


As usual, I roll it out on the thick side, then cut out my rounds. I like the bottoms to be thick because the topping are just SO sweet that the thicker cookie base is needed for balance. otherwise.. why am I not just making filled chocolates, you know?


ANYWAY. after my rounds were made, I had some dough left, so I rolled it nice and thin so I could have some graham crackers for the kids. (for the kids.. THIN is the key. I've made fun shapes for them in the past, using the same thickness as I do for my sugar cookies, and wow.. it's like eating dog biscuits. So for non-Happy-Jane graham cracker making? thinner is better in our house.)


but back to the Janes. I piped a home-made marshmallow butter cream on the rounds, then dipped them in a dark chocolate.


these were very very sweet. ALMOST too sweet for my taste with that marshmallow filling... but again.. the thicker graham rounds help spread out that sweetness so it wasn't a full-on assault of your teeth. (I do NOT recommend eating the toppings off the cookies first. really. TOO SWEET! YOW!)
Nonetheless... I think these will make a fine addition to the Happy Jane Flavor Roster. the best part? no camping required to enjoy them!

Lessons Learned: the marshmallow butter cream is not nearly as thick as some of my other toppings. when in the dipping stage, I find it is far better to dip the cookies and filling right after they have been removed from the freezer so they can withstand the heat of the melted chocolate. towards the end of the batch I had on my tray, I found that the filling was melting under the chocolate, and gave way to a 'broken shell' appearance. Still tasty.. but not as pretty to me.

oops!

Monday, December 22, 2008

Cookie Kits

One of the biggest indicators of me being 'off my mark' lately is the lack of activity on this blog. Ask me how much Christmas baking I've done this year. It's right about at the same level of how much shopping and Christmas card making/sending I've done.

next to nothing.


oh well.


there's still a few days til Christmas, so I may still get a fire under me and crank some stuff out. I DID, however, put some time aside to make some cookie kits for my daughter's preschool class.


I was lucky to be one of the volunteer moms for her Christmas party last week. Highlights of the party were to include pizza making, a story, and cookie decorating. The other mom said she would take care of the pizza supplies, so I happily said I'd take care of the cookie decorating.


The cookies themselves were no great shakes... I used a simple butter cookie recipe, and made enough so that each child would get one candy-cane shaped and one tree-shaped cookie to decorate. Because these kids are 4 years old, I kept the cookies on the thin side, versus my normal thick style I use for decorating with royal icing.


Inspiration hit to create the 'kits' when my daughter and son were working on a project together. arms flailing, tempers rising, and too much whining while two kids fought over who gets to use what materials are not a good combination when trying to stay on Santa's good list... and I pictured what it would be like with TEN boys and girls trying to reach for the same sprinkles at once.


Hence.. the cookie kits were born.


I hit up my local super-everything-store and purchased some inexpensive plastic containers. At a price of $2-something for a 4 pack... I'd say I got a good deal while staying on point for a budget.


Each kits also received three types of sprinkles, which were put in little plastic condiment cups. Let me tell you.. those cups are FANTASTIC. for storing sprinkles to putting ranch dressing for my daughter's carrot-stick snacks, to individual servings of jello-shots back in the day when my husband and I had more of an industrious social life.... anyways... LOVE them. and the lids... don't forget the lids! seriously.. they are so perfect and useful for SO many things... I always have them in my pantry.


so each kit got the sprinkles, two cookies, a plastic spoon, and some vanilla frosting that I put in the disposable pastry bags, then tied in a knot. no mess, no fuss, no fighting or reaching or germs spreading from one set of sticky fingers to the communal sprinkles. Well.. maybe not so much on the 'no mess' part. they are FOUR, after all.


I rounded out each kit with a splash of color on the top, then individual labels for each child.


really.. this was such an easy thing to prepare.. and so inexpensive... and each child felt special cause it was made especially for them.


So while this project didn't involve a LOT of baking.. I think it deserves to be on here in my baking journal because it accompanies the experience of EATING the baked goods. I will totally do these kits again for one of my children's future birthday parties. From what I could tell, it was a hit with the kids and teachers alike.... so for sure this will be on my list of things to do again. After all.. happy, non-fighting kids equals happy, non-yelling mom.


Lessons Learned: If I were to ever market this, I would definitely include a 'decorating mat' of some sorts, and perhaps a little explanatory note card. Something cutesy and fun like a check-list or decorating ideas... whatever was age or theme appropriate. Best part is that this can be made to suit any theme, and as said previously... was fairly inexpensive to create.

Sunday, November 23, 2008

Birthday Boy

Yesterday we had a little party for my son. He turned two this week, and while he doesn't use a lot of words, he THOROUGHLY enjoys singing along to a variety of songs.


One song he particularly enjoys is "Old MacDonald". He loves mimicking the animal sounds and the simple "E-I-E-I-O" refrain. Consequently, we decided to go with a barnyard/farm theme for his party. While I have no problems eating meat, I prefer to think of farms as places where animals LIVE, and we harvest vegetables from... so Danny's cake and accompanying cupcakes focused on veggies.


Now, a while back, I had played with some gumpaste in attempt to practice making fruit/veggie cupcake toppers. as cute as they did turn out.. I was overall left a little disappointed. Gumpaste , while edible, isn't exactly TASTY. and it's HARD. like break a child's tooth HARD. Imagine, then, my delight when I read the book Hello, Cupcake. Not only did it feature a garden-party cupcake for me to replicate.. but the authors suggested taking ready made candies and ingredients to make into the vegetables.


The result? amazing. I used starbursts and m&m candies, licorice, cornflakes and graham crackers in conjunction with some home made cake and frosting, a little melted chocolate and color gels... and I managed to produce the following.


Now, I still wouldn't allow my 2 year old birthday boy (or his 4 year old sister) to eat the starbursts-turned-veggies.... but in a few years I could totally see them eating every little bit of the cupcake, and still having teeth left to brush when they were through.


Lessons Learned: heating the starbursts in the oven worked better than the microwave. Also? best tip EVER??? rolling the 'carrots' in cinnamon after I made the decorative growth lines made the carrots look OH-SO real. and LOVED the idea of coating the cornflakes in green frosting. the 'leaves' looked truly authentic.


I'm not saying I'll never use gumpaste again.. but for basic colors and for items for kids? the reshaping of chewy candies is really the way to go!

Thursday, August 7, 2008

When it's Too Hot

So here in the south.. it's hot out. like all day long.

like still 88 degrees after 9pm hot.

of COURSE, a SMART mom would find nice cold treats to give her kids... ones that do not require turning an oven on, perhaps. BUT... cookies are what I do best... and it really is something that my kids can help out with.

The other day we made a small batch of chocolate cookies, and my daughter rhena insisted on making some ice cream cookies.

We had a good time decorating them with sprinkles and the such. The ones the kids did didn't quite turn out as 'real' looking.... but they sure were colorful. here's one that I was allowed to do without 'help'.


the best part? they're pretty portable after the icing dries, and no matter what side of the cookie my daughter eats first.. no dripping!!!


Saturday, May 3, 2008

Bake Sale- May Edition part 1

I decided to try out a biscotti recipe this time around. Being that in general, I CAN NOT STAND the taste of almond flavored things... (amaretto? blah! plegh! kaploooey!)
I saw this recipe and thought I could give it a shot.

I was intimidated.

I had never made a loaf-like cookie before, and given my general dislike for biscotti (too hard! too almondy! is this stale??) I wasn't even sure if this was a good idea.. but alas.. gotta step outside the comfort zone.

SO I had visions of grandeur that I would chop up some walnuts or pecans to put in the cookies instead of the chocolate, then half-dip the cookies when complete in chocolate.

but. no nuts.

no mini-chips, either. so I used normal sized milk-chocolate ones.

The recipe notes that you should grease your hands before forming the rectangular-shaped dough logs, because the dough will be sticky. The idea of rubbing crisco on my hands made me vomit in my mouth a little, but after trying to just pick UP the dough, I realized that when I step out of my comfort zone.. I go for the gusto.

I smeared the crisco all over my hands, and was able to shape the dough. (of course.. I chose too small of a pan to fit the two loaves on one, so I had to shimmy the one loaf over to the center, then grease up yet ANOTHER pan, and my hands AGAIN, and form the other log. Rubbing shortening between my hands made me want to start another diet like IMMEDIATELY, btw..)


after the first round of baking, I let the loaves cool for per the recipes directions. I then cut the slices, and place on the cookie sheet again to bake/brown/dry out.

10 minutes later, I flipped them, and baked some more.

I also had some leftover chocolate from the apples I made.. so I did actually do the dip.


the final product was a nice golden color, and the taste was a pleasant surprise. not OVERLY banana-y, not TOO chocolaty, and by luck of my mistake.. it wasn't rock hard. one, because I'm sure it was still oven-fresh.. the other cause I think I didn't bake it long enough the first round in the oven. and the biggest thing... no almonds.


Lessons learned: this was a long process to undergo for a cookie I wasn't sure I would actually like. kind of a pain with the in-out-cut-in-out-flip-in-out baking. but I liked the taste. the KIDS LOVED the cookies. I think this recipe, with some educated substitutions, would make great teething cookies.... again.. only if I found a way to cut the sugar and up the fruit/fiber. might be something to work on in the future.

Saturday, April 5, 2008

Oopsie Daisies

This weekend is another bake sale for church. I had intended on making the bird nests for church, but ended up doing them with Rhena for her preschool classmates.

Sticking with things that are geared for kids.. I threw a big whup-whup for days gone by and decided on making cone cakes.

you know.... anyone over 30 has HAD to at least had a cupcake baked in a cake cone at some point during their school years. you know.. before the days of everyone being allergic to everything and no parent being allowed to home-make any treat for the class without a pre-approved nutritional label and ingredient list? NOT that there's anything wrong with that, cause if MY kids were allergic to something, I wouldn't want them digesting something that could.. you know.. cause death or seizing or something.

anyways.. I thought.. ice-cream cupcakes! how fun! how cute!

so with my folks arriving and the deadline for submitting donated goods looming, I opted to just use a box mix, and get to baking.

filled up the cones.


I only did a total of 12, though. halfway into pouring the batter, I thought about how in hell I planned on transporting the cones TO church... as well as how to wrap them/present them for sale. errrrg.

oh well. I pressed on.

after the cakes had cooled, I filled up a pastry bag with frosting and let it stiffen up a little by putting it in the fridge for a little bit. I swirled the frosting around the top, trying to get that 'soft-serve' look.

the first couple didn't turn out so hot. turns out it takes an INCREDIBLE amount of frosting to get the height required to look similar to a real ice cream cone. like.. a "no way would I let rhena eat one of these cause she'd be up for a week from the sugar" amount.


after I had about 6 frosted... something distracted me and I jostled the tray I had the cones on.

PLOP. 2 of my cones. on the floor.


and that's when it hit me. inspiration is funny like that.

I decided to frost the cones, garnish with sprinkles, then "plop" them up-side down in little pie tins.

I was able to easily wrap them in plastic wrap, and transport 9 of them to the sale without affecting the final look of each treat.


I call them the "Oopsie-Daisy"... an up-side down chocolate cone cake. *I* thought they looked cute. I guess I'll find out tomorrow after mass whether or not they're a hit.


lesson learned: top-heavy cupcakes are not very practical. maybe for an at-home party.. but definitely not a transport-friendly item. I might try this project again with a meringue top?
the final result wasn't what I had in mind when I started, but sometimes that just happens.

Thursday, April 3, 2008

Bye Bye Birdie


Saw THE most adorable idea at Lauren's site around Easter. With the monthly bake sale starting up again at church (they were on hold during Lent)... I was thinking the nests would be a good spring treat, as well as a project Rhena would be able to help with.

Then, by coincidence, Rhena's preschool topic for the week happens to be birds, nests and springtime. We decided to make the nests for her class instead of the bake sale. (I've got other stuff up my sleeve for this weekend, anyway)


I had bought some gum paste on tuesday morning, with the idea that I would attempt top attach some flowers to the nests.. you know.. pretty them up a bit. but since this turned to a child-helping project, I opted to pass on the gum paste.


Overall this was a simple project. I double-boiled the chocolate morsels, which I just prefer cause it allows me to make sure there are no burned spots.. but I had to switch to a bigger bowl once I added the chinese noodles.


at first I was stressed about 'breaking' the noodles, but now having made a full batch, I would definitely toss and coat more vigorously next time. or maybe use a bag and a half of morsels to one bag of noodles. cause you know.. chocolate isn't necessarily a BAD thing to have more of.

this picture makes me hungry and kinda grossed me out at the same time. but see the uncoated spots?? the final products looked and tasted fine with them.. but again.. next time I would say more chocolate.


After the noodles were 'coated', we dropped them on to parchment lined bake sheets.


Rhena helped by 'squooshing' down the nests. I originally thought the shot glass would help to make a bowl-like indentation, but we made the nests smaller (needed at least 15 for her classmates, and again... keeping in mind the recipients were 3 and 4 year olds... didn't want them humongous) so the shotglass really didn't do much shaping. but don't tell her that.


instead of using a pre-fabbed egg or jelly beans as most of the posted noodle nest recipes call for.. I jazzed it up a little and made some 'Robin's Eggs' with blue-dyed white chocolate-coated mini oreos. Rhena decided to jazz up my day by choosing her own clothes... just in case you were wondering.


Once the cookies were dipped and fully coated, I let them cool on parchment.


Once everything had a chance to cool and set; the eggs were "glued" into place with canned frosting. I was GOING to make a batch of stiff royal icing, but opted for ease and availability.


I should have dyed the icing, too.. cause you can see the white upon close inspection.


Plated up and complete.


lessons learned; I would for sure make the nests a little bigger, so I could have more of a bowl shape. Also I would use more chocolate. The varying shade of brown in the final product isn't BAD, but again... more chocolate can't be a bad thing.

Next time I do this, I will play with gum paste.. maybe add some flower decoration? and for sure I will use the royal icing to glue the eggs in. the frosting was just too soft and didn't hold the eggs very well.